See What Your Shopify Customers Are Doing While You Reply
 HeyChat Team
A shopper messages you asking about a discount on "that black hoodie." Without context, you ask which one. With the Shopify connector enabled, you already see the exact product they are looking at, the size in their cart, and the running total — before you type a word. This guide covers the install, the one theme setting you have to fill in yourself, and what the sidebar panel shows.
Who can set this up? Connecting Shopify requires Owner Only permissions, and the HeyChat chat widget has to be enabled first — the Connectors section lives inside it. Once connected, every agent sees the live context panel in the customer sidebar.
What is a connector?
A connector is an external app that pushes live customer context into HeyChat — it is not a messaging channel. Shopify is the first connector. Future connectors (WooCommerce, Calendly, Stripe) follow the same pattern: they enrich the customer sidebar with data from the tool your shopper is using right now.
HeyChat already separates two ideas. Integrations are the platforms customers message you from — WhatsApp, Telegram, Messenger, Email, the embedded chat widget. Connectors are the apps that tell you what those same customers are doing outside the inbox.
Integration
Inbound message channel. Telegram, WhatsApp, Discord, the chat widget. Produces messages your team replies to.
Connector
External context source. Shopify today; more apps later. Pushes state (browsing, cart) into the sidebar without creating messages.
What do agents see?
A "Shopify" row appears in the contact's Details sidebar, and clicking it expands the live context. The row itself carries a badge with the number of items in the cart and how long ago the last event arrived, so an agent can read the state without opening anything.
Now browsing
The product the shopper is currently viewing — image, title, price. On a non-product page the block becomes Current page instead, with the page title as a link you can open.
Cart
Line items with quantity and price, and the total in the store's currency. An add-to-cart shows the item that was added; the full itemized list arrives the moment the shopper opens their cart page.
The panel is read-only. Agents cannot edit the cart or apply discounts from inside HeyChat — that stays in Shopify. The goal is context, not control: agents see exactly what the shopper sees so the reply lands on the first try.
How does the Shopify connector work?
Two Shopify extensions feed the panel, and both run client-side on your storefront. The HeyChat Events web pixel sends shopper events to HeyChat. The HeyChat Live Chat theme app embed loads the chat widget and binds the visitor's identity to the events stream. Neither one can read your orders, customers, or products.
Customer browses the store
The HeyChat Events pixel subscribes to Shopify's standard customer events — page_viewed, product_viewed, cart_viewed, product_added_to_cart, product_removed_from_cart, checkout_started, search_submitted, collection_viewed.
Pixel beacons the event to HeyChat
Each event is sent via sendBeacon to a public endpoint. Events are attributed to your company by API Key, with an event-name allowlist, an 8 KB payload cap, and a per-key rate limit (20 events / 10 seconds).
Backend updates connector state
The event is mapped into a state patch (current product, current cart) and stored per visitor. Conversation history is not affected — this is sidebar state, not a message.
WebSocket pushes the update to agents
Once the state is linked to a HeyChat contact, a connector_state_changed event is broadcast to any agent viewing that customer. The sidebar panel re-renders without a page refresh.
How is the shopper linked to a HeyChat visitor?
The chat widget hands its visitor ID to a bridge script in the HeyChat Live Chat embed, which publishes it into Shopify's analytics layer. The HeyChat Events pixel picks it up and stamps that ID on every subsequent shopper event, which is how Shopify's anonymous client ID gets matched to the right HeyChat contact. Without the chat embed there is no ID to stamp, so events arrive with nowhere to show.
How do I connect Shopify?
Owner OnlyThe install starts on Shopify, not in HeyChat. You install the HeyChat app on your store, approve two scopes, and Shopify sends you back to attach the store to your HeyChat account. Shopify only lets an app install its own web pixel through this flow, so there is no manual alternative.
-
1
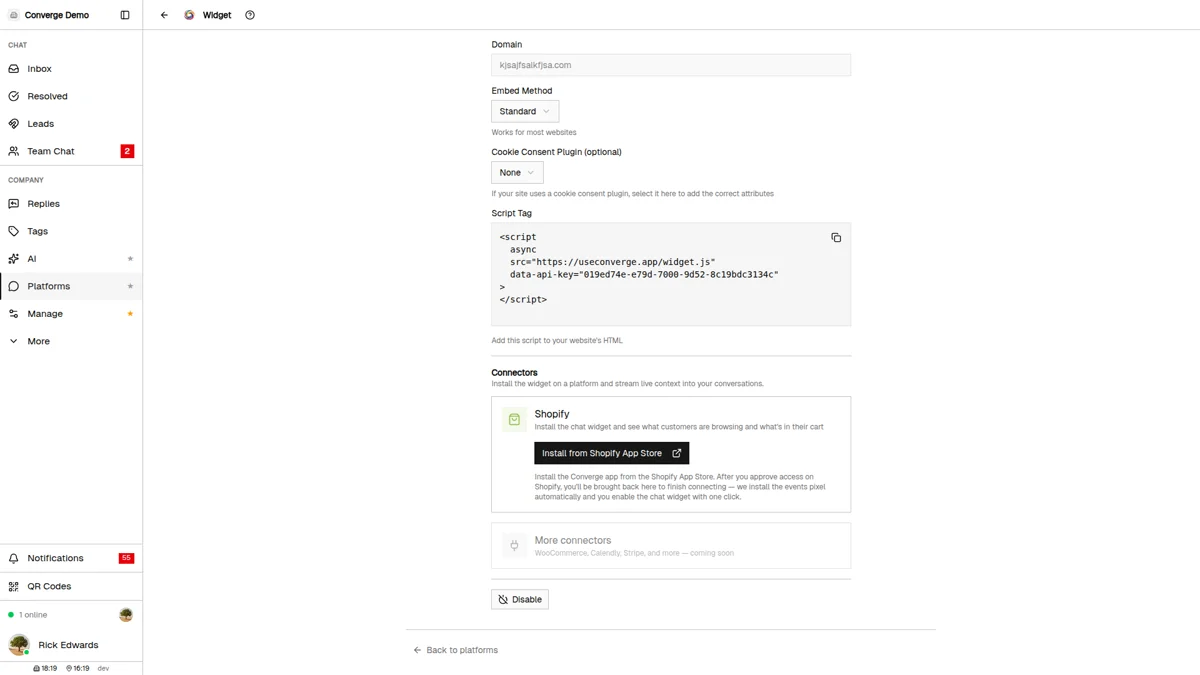
Open Platforms → Widget → Connectors
In HeyChat, click the Platforms icon in the sidebar, open the Widget card, and scroll to the Connectors section at the bottom. It renders for owners only.
-
2
Click "Install from Shopify App Store"
This opens the HeyChat listing on the Shopify App Store. Install it on the store you want to connect. Starting the install from your Shopify admin instead works exactly the same way.
-
3
Approve the two scopes
Shopify shows its standard authorization screen asking for
write_pixelsandread_customer_events. Nothing else is requested — no orders, no customers, no products. -
4
Finish the link in HeyChat
Shopify returns you to a HeyChat page that attaches the store. Sign in as the owner if you are prompted — the account you land in is the one the store is attached to. HeyChat then installs the HeyChat Events pixel and records your
.myshopify.comdomain. -
5
You land back on Platforms → Widget
The Shopify card shows a green Connected badge next to your shop domain, and a toast offers an Open theme editor action — that is the last step (see the next section).
How do I enable the chat embed?
Theme app embeds belong to your theme, not to the app, so Shopify makes you turn this one on yourself. The toast from the connect step deep-links straight to the right panel in the theme editor.
-
1
Click "Open theme editor" in the toast
A new tab opens on your current theme's App embeds panel with the HeyChat Live Chat embed activated.
-
2
Paste your API Key into the embed
The embed has its own API Key field, and it starts empty — the connect step sets the key on the events pixel, not on your theme. Copy the key from the embed snippet on Platforms → Widget (the
data-api-keyvalue) and paste it in. The widget does not load while the field is blank. -
3
Click Save in the theme editor
The chat widget is now live on every page of your storefront, and the events pixel has been running since the connect step.
HeyChat Events is not in this list. It is an app pixel, which Shopify installs and runs on your behalf when you approve the scopes. There is nothing to toggle and no second key to paste — only HeyChat Live Chat appears under App embeds.
How do I verify it is working?
Open your storefront in one tab, your HeyChat inbox in another, and send a message to yourself. The Shopify panel should appear in your customer sidebar within seconds.
-
1
Open the storefront in an incognito window
An incognito window guarantees a fresh visitor ID, so the test conversation does not collide with any existing customer.
-
2
Open the chat widget and send "test"
Do this before you browse. Sending the first message is what creates the HeyChat contact that the shopping context attaches to.
-
3
Browse a product and add it to the cart
A product page fires product_viewed; adding an item fires product_added_to_cart. Open the cart page too, so the full itemized cart is sent.
-
4
Open the conversation and expand the Shopify row
In the Details sidebar, click Shopify. You should see the product you viewed under Now browsing and the item you added under Cart.
-
5
Navigate to a different product
The Now browsing block should update within a second or two without you reloading the inbox.
If nothing appears: check that the HeyChat Live Chat embed is toggled on with your API Key saved, that the Shopify card in HeyChat still shows Connected, and that you are testing on the published storefront rather than a theme preview link.
Best practices
Enable the widget before you connect
The Connectors section only renders inside an enabled HeyChat widget integration. If you cannot find it on Platforms → Widget, turn the widget on first.
Finish the chat embed, not only the connect
The connect step gets you the events pixel. Without the chat embed and its API Key, events arrive with no conversation to attach them to and the sidebar stays empty.
Keep the chat embed's key in sync
The embed stores a copy of your Widget API Key. If that key ever changes in HeyChat, paste the new one into the theme embed or the widget stops loading on your storefront.
Check Now browsing before answering ambiguous questions
If a shopper writes "is this in stock?" with no link, look at the panel first. It is faster than asking and the customer feels understood.
Disconnect cleanly when leaving Shopify
If you stop using the connector, click the delete icon on the Shopify card in HeyChat. That removes the stored token and every saved context snapshot. Uninstall the HeyChat app inside Shopify too, so the pixel stops firing.
Frequently Asked Questions
What is the difference between a connector and an integration in HeyChat?
Does HeyChat read my Shopify orders or customers?
What does the agent see in the Shopify sidebar panel?
Where does the Shopify install start?
Do I still have to paste an API Key anywhere?
Who can connect Shopify in HeyChat?
Can the pixel see the wrong company's customers?
What's next?
The Shopify connector is live. Here are related guides that pair well with it:
- Widget Guide — customize the chat widget that the Shopify embed loads on your storefront
- Replies Guide — set up quick replies that reference the customer's current product or cart
- Inbox Guide — find the customer sidebar, filters, and bulk actions that surround the Shopify panel
Need more help?
Our support team is here for you. Click the chat widget in the bottom right corner to start a conversation.
We typically respond within minutes during business hours.